
| Document ID | CPENG07 |
| Product | Security Gateway |
| Version | R80.10, R80.20, R80.30, R80.40 |
| OS | Gaia |
| Platform / Model | All |
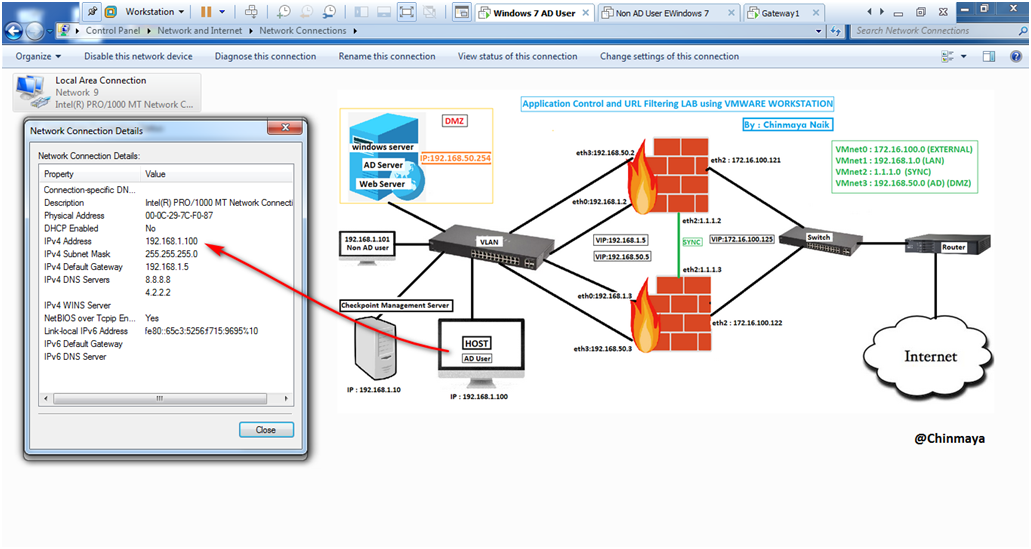
Topology

VM Configuration details:

Before I am processed , the above diagram that you see , that is my existing Cluster setup.
So click the below link to setup LAB for Cluster Setup First and add the default route to communicate between HOST machine (IP:192.168.1.100) and the ADServer (IP:192.168.50.254).
NOTE : Cluster Setup is not necessary for doing this LAB , we can use a Single Gateway or a standalone setup as well.
With our existing Cluster Setup , we are going to do add a Userbase security rule like we add ADuser in our rule base to block or allow URL.
Before we processed see the below details.
Note: It’s a very simple Setup don’t think its complicate , Kindly reach us in case you have not got any clarity.
IP Address Details
Gateway 1 (Active) IP : Internal (eth0) –> 192.168.1.2/24 || External (eth2) –>172.16.100.121/24
Gateway 2 (Standby) IP : Internal (eth0) –> 192.168.1.3/24 || External (eth2) –>172.16.100.122/24
Cluster VIP (Virtual IP) : Internal –> 192.168.1.5/24 || External –> 172.16.100.125/24
Sync IP : Active Gateway (eth1) —> 1.1.1.2/24 || Standby Gateway (eth1) —> 1.1.1.3/24 (NO Virtual IP Required)
DMZ Network(AD Server)
Gateway 1 (Active) IP : Internal (eth3) –> 192.168.50.2/24 | External (eth2) —>172.16.100.121/24
Gateway 2 (Standby) IP : Internal (eth3) –> 192.168.50.3/24 | External (eth2) —>172.16.100.122/24
Cluster VIP (Virtual IP) : Internal –> 192.168.50.5/24 | External –> 172.16.100.125/24
Management Server IP : 192.168.1.10/24
AD Server IP : Internal IP —> 192.168.50.254/24
Route Configuration
Internal LAN (192.168.1.0/24) —-> Default Gateway (VIP : 192.168.1.5/24)
DMZ Network (192.168.50.0/24) —–> Default Gateway (VIP : 192.168.50.5/24)
Gateway IP (172.16.100.121/24 & 172.16.100.122/24) —> Default Gateway (VIP:172.16.100.1/24)
Host Machine (Where VMware is installed) —> 192.168.1.1/24
VMNet Details
VMnet0 : Auto-Bridging : External : 172.16.100.0/24
VMnet1 : Host-Only : Internal : 192.168.1.0/24
VMnet2 : Host-Only : Sync : 1.1.1.0/24
VMnet3 : Host-Only : DMZ Network : 192.168.50.0/24
DNS & AD Server IP : 192.168.50.254/24
Let’s Start..
STEP 01: Check the HOST machine IP address.
I assign IP address as 192.168.1.100/24.
STEP 02: Check the connectivity between the HOST machine (192.168.1.100/24) to ADServer (192.168.50.254/24).
Ping 192.168.50.254 (Its communicate)

STEP 03: Check the DNS address of the HOST machine (192.168.1.100/24).
command : CMD>ipconfig /all
Its showing DNS address : 8.8.8.8 and 4.2.2.2 but as we already configure DNS server in windows server also ADServer in Windows Server with IP:192.168.50.254/24.

STEP 04: Changing the DNS address and give the DNS Server which configure in Windows Server.
Ping to DNS Server 192.168.50.254 for communication.

STEP 05: Did nslookup and also ping to checkpointfirewall.com (DOMAIN address of ADSerevr) for verification.
CMD>ping checkpointfirewall.com (if Its Response then OK)
CMD>nslookup checkpointfirewall.com (If its resolved DNS Server IP then OK)

Some Additional step.
STEP 06: Add the Domain Name “checkpointfirewall.com” in Host Machine (Windows 7 IP:192.168.1.100).
Location : System Properties —> Change Setting —> Change —> Domain (checkpointfirewall.com)

STEP 07: Click “OK” to get the Login popup.
Login with username and password that you already create in ADServer.

STEP 08: I am login with username : Chinmaya that I already created in ADServer.
If you want to know who to create a user in ADServer the check the below link for details.

STEP 09: Domain added successfully.

STEP 10: Restart the windows HOST machine (IP:192.168.1.100).

STEP 11: You can Login with username : Administrator but I am going to login username : Chinmaya.

STEP 12: Click “Other User”.

STEP 13: Login with Username : Chinmaya.


STEP 14: Enable the “Application Control ” and “URL Filtering” Blade in Cluster.
Location : SmartConsole —> Cluster Object —> General Properties

STEP 15: Click “Yes”.

STEP 16: Create a Policy layer for “Application Control and URL Filtering”.
Location : SmartConsole —> Security Policies —> Access Control —> Policy —> Edit Policy


STEP 17: Click “+” icon and Click on “New Layer” for adding the new layer (Application Control and URL Filtering).

STEP 18: Give Object Name : Application Control and URL Filtering
Blades : Application & URL Filtering.

STEP 19: Click on “Advanced” Tab and Select Implicit Cleanup Action as “Accept”.

STEP 20: Showing “Application Control and URL Filtering” layer is added in Access Control.

STEP 21: Still I am not create any rule only give Rule name as “Test_URL_Rule”. so before we creating the ” Application Control and URL Filtering ” rule first we are going to create a Network access rule.

STEP 22: The current rule is having two rule one is “Accept” and “Drop”.
Create a network access rule to access the internet for LAN network.

STEP 23: Create a network Object I create as
Object Name : Internal_LAN : 192.168.1.0/24
NAT : Hide

STEP 24: For nating configuration go to NAT section in Network Object
Mark “Add automatic address translation rules”
Translation method : “Hide“
Select : Hide behind the gateway

See the rule.
NOTE : Please also specify the service.

STEP 25: Go to “Application Control and URL Filtering” and create a access control rule to create a user base rule.
Click “+” icon.

STEP 26: Click “*” icon and select “Access Role…”.

STEP 27: Go to “users” section and click “+” icon.
Select the AD Domain Name and once you select the domain you able to see the user and then select the user accordingly.

STEP 28: See the Domain ” checkpointfirewall.com” and see the user as well.

STEP 29: I am select the user “Chinmaya Naik”.

STEP 30: Added Username : Chinmaya Naik successfully.

See the “Distinguished Name”.

STEP 31: Give a name to the “New Access Role”
I give as “Chinmaya” and click “Ok”.

STEP 32: After added the Source : Chinmaya
Add Destination as “Internet” so select “+” icon in destination and select “Internet“.

STEP 33: In “Services & Application” add I am selecting “Social Networking” to block social networking websites.
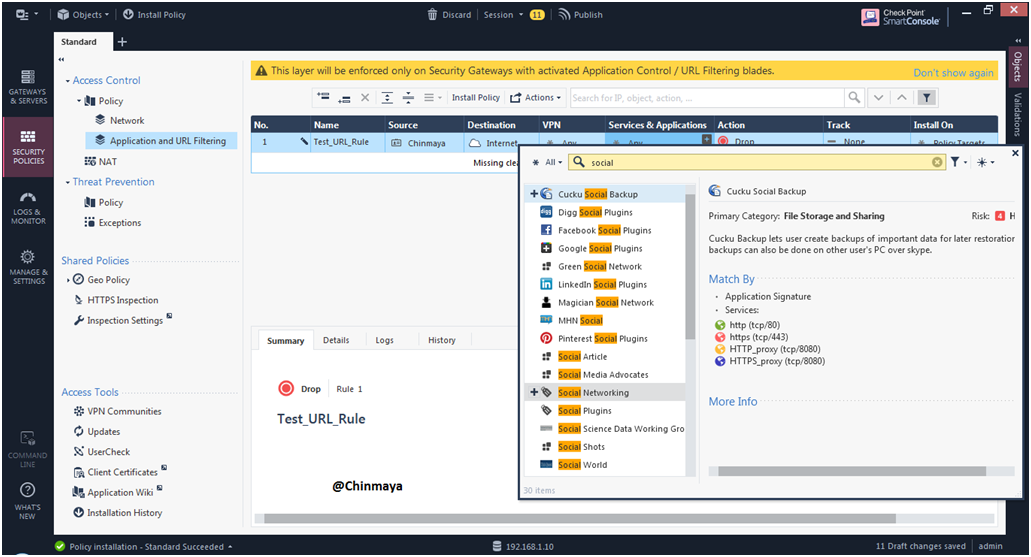
STEP 34: Add action as : Drop and Blocked Message
So by selecting this action then user “Chinmaya” able to see the Blocked page whenever user “Chinmaya” try to access the social networking websites.

STEP 35: Track as “Log”.
NOTE : Also select the Details Logs for logs.

STEP 36: Name : Test_URL_Rule | Source : Chinmaya |Destination : Internet | VPN : Any | Services & Application : Social Networking (category) |Action: Drop/blocked message |Track : Log/Accounting .

STEP 37: Look like this.

See again with Diagram.

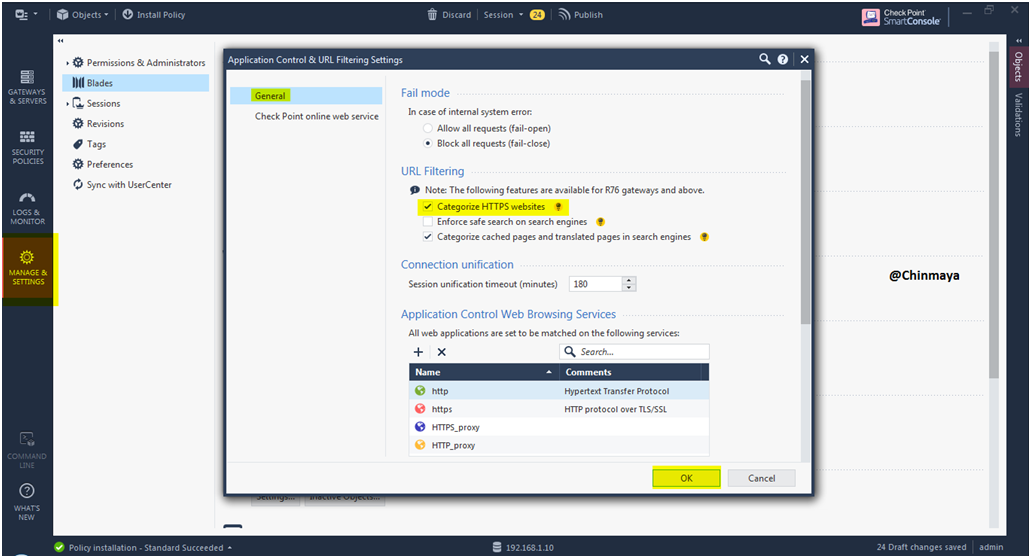
STEP 38: Change in engine setting of “Application Control and URL Filtering”.
Mark “Categorize HTTPS websites” and click “Ok”.
Location : Manage & Setting —> Blades —> Application Control and URL Filtering —> Advanced Settings —> General
NOTE : Make sure that when we enable this option then HTTPS inspection should disable. so basically both “HTTPS Inspection and Categorize HTTPS website”s can’t enable.
STEP 39: Install database..

STEP 40: Install the Access control policy.

STEP 41: See after installed the policy windows Host Machine (192.168.1.100) able to ping google.com means now we can assess the sites base on the policy.

STEP 42: Websites facebook.com is successfully block.
“www.facebook.com” come under “Social Networking” categorize , that categorize I already added in Policy.

STEP 43: See the facebook block logs.

STEP 44: Add custom site to block or allow the URL.
Click “+” icon in “Services & Application” section —> Custom Application/Sites —> Application/Sites.

STEP 45: Name the new Application/Sites as name such as I give : Custome_Site01 and add URL by click “+” as some format like
*thehackernews* | https://thehackernews.com | www.thehackernews.com
Click “Ok”

STEP 46: Install the Database and install the policy.

STEP 47: Access the URL for testing.
“thehackernews.com”

STEP 48: Site getting block and able to see the Block page , showing block by “Custome_Site01” category.

STEP 49: See the block logs in tracker.
Select blade “URL Filtering” in Logs Filter.

STEP 50: See the Matched rules.
“Accept” in Access Control policy and “Block” in “Application Control and URL Filtering” policy.

STEP 51: See the Logs.

STEP 52: See the Rule with logs.

STEP 53: See the details of Drop logs.

STEP 54: See the username “Chinmaya Naik” in Drop logs.


Leave a Reply